June 15, 2023 / Nirav Shah
You can create a CloudFormation Template using either a YAML or JSON file. We’re going to use a YAML file in this tutorial.
In this template, we’ll be creating an EC2 instance, we’ll configure a Security Group for EC2, and add a script to deploy a simple NodeJS app.
Note:
There are over 224 types of resources in AWS, but we need to create an EC2 resource. Resources represent the different AWS Components that will be created and configured. We’ll define the Resource type identifiers in the below format:
AWS::aws-product-name::data-type-name
The resource format for the EC2 instance is Aws::EC2::Instance. To learn more about AWS resources and syntax, checkout the AWS official documentation and play with it. Look at the EC2 documentation to understand the declaration of EC2 instance. Both JSON and YAML syntax is available but we’ll stick with YAML for this tutorial.
There are a lot of properties available to customize the creation of our EC2 instances. To make things simple, we’ll be configuring Availability Zone, Imageid, and Instance Type which are basic properties needed to create an EC2 instance.
Resources:

NodejsDeploy:

Type: AWS::EC2::Instance

Properties:

AvailabilityZone: us-east-1a

ImageId: Your-instance AMI-id

InstanceType: t2.micro
AWS CloudFormation – EC2 Instance configuration
Here NodejsDeploy refers to the name of the resource we’ll be creating. You can name your resource as your wish.
Let’s see the process to deploy the NodeJS app.
We’re going to deploy the NodeJS app using the User Data property in the EC2 resource.
If you don’t know about EC2 user data, it is a feature of AWS EC2 which allows us to pass information during the launch of the EC2 instance. You can use it to perform custom actions, such as installing software and executing the script.
Let’s write the bash script to deploy the NodeJS app and attach it to the user data.
Here is the simple script to deploy the NodeJS application:
#!/bin/bash

set -e

curl -sL https://deb.nodesource.com/setup_19.x | bash -

sudo apt install nodejs

node -v

npm -v

curl -sS https://dl.yarnpkg.com/debian/pubkey.gpg | sudo apt-key add -

echo "deb https://dl.yarnpkg.com/debian/ stable main" | sudo tee /etc/apt/sources.list.d/yarn.list

sudo apt update && sudo apt install yarn

yarn --version

sudo -i -u ubuntu bash << EOF

set -e

cd /home/ubuntu

sudo npm install -g pm2

git clone https://github.com/5minslearn/node_with_docker.git

cd node_with_docker

yarn install

pm2 start yarn --time --interpreter bash --name sample_node -- start -p 8000

EOF
The above script installs NodeJS, Yarn, and PM2. It clones a NodeJS project from Git, installs the dependencies, and starts the app with PM2.
Our next step is to attach this script to the CloudFormation template.
How to Attach User Data to the CloudFormation Template
Resources:

SampleNodejsDeploy:

Type: AWS::EC2::Instance

Properties:

InstanceType: t2.micro

ImageId: ami-08e5424edfe926b43

UserData:

Fn::Base64:

#!/bin/bash

set -e

curl -sL https://deb.nodesource.com/setup_16.x | bash -

sudo apt install nodejs

node -v

npm -v

curl -sS https://dl.yarnpkg.com/debian/pubkey.gpg | sudo apt-key add -

echo "deb https://dl.yarnpkg.com/debian/ stable main" | sudo tee /etc/apt/sources.list.d/yarn.list

sudo apt update && sudo apt install yarn

yarn --version

sudo -i -u ubuntu bash << EOF

set -e

cd /home/ubuntu

sudo npm install -g pm2

git clone https://github.com/5minslearn/node_with_docker.git

cd node_with_docker

yarn install

pm2 start yarn --time --interpreter bash --name sample_node -- start -p 8000

EOF
EC2 Instance configuration with UserData property
You’ll notice that the User Data property is added to the EC2 block. Fn::Base64 is a function in AWS CloudFormation that allows users to encode a string to base64 format. This function can be used to pass sensitive information, such as credentials, to AWS resources in a secure manner. Since EC2 user data is not encrypted its always best practice to encode it.
Right below that line, you can see a small vertical bar (|). It is used for multi-line string support as our script is more than 1 line.
Alright. Now we have a script to deploy the NodeJS app. But, we have to remember one super important item. By default, NodeJS applications run on port 8000. We should expose port 8000 from EC2. Now we need to create a security group configuration for our EC2 instance.
This process is similar to creating an EC2 instance, except we’ll replace the type from Instance to SecurityGroup.
NodejsDeploySG:

Type: AWS::EC2::SecurityGroup

Properties:

GroupDescription: for the app nodes that allow ssh, http, 8000

SecurityGroupIngress:

- IpProtocol: tcp

FromPort: '80'

ToPort: '80'

CidrIp: 0.0.0.0/0

- IpProtocol: tcp

FromPort: '22'

ToPort: '22'

CidrIp: 0.0.0.0/0

- IpProtocol: tcp

FromPort: '8000'

ToPort: '8000'

CidrIp: 0.0.0.0/0
AWS CloudFormation – Security Group configuration
The above code should be pretty self explanatory – we defined a Security group, allowing ports 22 (SSH port), 80 (HTTP port), and 8000 (NodeJS). We named the Resource as NodejsDeploySG.
You may be wondering – “We’ve created a template for creating a Security group but how will this be linked to the EC2 instance?”
The solution is simple. CloudFormation provides an intrinsic function called ! Ref that allows us to reference a resource or parameter within a CloudFormation template.
Resources:

SampleNodejsDeploy:

Type: AWS::EC2::Instance

Properties:

InstanceType: t2.micro

ImageId: Your-instance AMI-id

SecurityGroups:

- !Ref NodejsDeploySG

UserData:

Fn::Base64:

#!/bin/bash

set -e

curl -sL https://deb.nodesource.com/setup_16.x | bash -

sudo apt install nodejs

node -v

npm -v

curl -sS https://dl.yarnpkg.com/debian/pubkey.gpg | sudo apt-key add -

echo "deb https://dl.yarnpkg.com/debian/ stable main" | sudo tee /etc/apt/sources.list.d/yarn.list

sudo apt update && sudo apt install yarn

yarn --version

sudo -i -u ubuntu bash << EOF

set -e

cd /home/ubuntu

sudo npm install -g pm2

git clone https://github.com/5minslearn/node_with_docker.git

cd node_with_docker

yarn install

pm2 start yarn --time --interpreter bash --name sample_node -- start -p 8000

EOF


SampleNodejsDeploySG:

Type: AWS::EC2::SecurityGroup

Properties:

GroupDescription: for the app nodes that allow ssh, http

SecurityGroupIngress:

- IpProtocol: tcp

FromPort: '80'

ToPort: '80'

CidrIp: 0.0.0.0/0

- IpProtocol: tcp

FromPort: '22'

ToPort: '22'

CidrIp: 0.0.0.0/0

- IpProtocol: tcp

FromPort: '8000'

ToPort: '8000'

CidrIp: 0.0.0.0/0
Add Security Groups configuration to EC2 Instance
You can see that the SecurityGroups property is added to the EC2 instance and the created Security Group configuration is linked to the EC2 instance by using the !Ref parameter.
Now we have the CloudFormation template. But we’re not yet finished. We’re still missing one more thing. Can you figure it out? We created an EC2 instance, and we allowed an SSH port…but to log in using SSH we need to attach a key-value pair, right? Let’s do that.
We can attach the key-value pair name directly to the template. For example, let’s assume your key-value pair name is CFNodejs you can attach the property KeyName directly to the EC2 resource block like what’s shown below or we can pass it in via parameters.
Resources:

  SampleNodejsDeploy:

    Type: AWS::EC2::Instance

    Properties:

      InstanceType: t2.micro

      ImageId: Your-instance-AMI-id

      KeyName: CFNodejs

      SecurityGroups:

        - !Ref NodejsDeploySG
AWS CloudFormation – Key Name for EC2
We can use parameters to get the name of the key-value pair from the user while creating the stack. Basically, parameters allow us to pass input values into CloudFormation templates at runtime. Let’s see how to do that.
Parameters:

SSHKey:

Type: AWS::EC2::KeyPair::KeyName

Description: name of the key pair to ssh into the instance

Resources:

SampleNodejsDeploy:

Type: AWS::EC2::Instance

Properties:

InstanceType: t2.micro

ImageId: Your-instance AMI-id

KeyName: !Ref SSHKey

SecurityGroups:

- !Ref NodejsDeploySG

UserData:

Fn::Base64:

#!/bin/bash

set -e

curl -sL https://deb.nodesource.com/setup_16.x | bash -

sudo apt install nodejs

node -v

npm -v

curl -sS https://dl.yarnpkg.com/debian/pubkey.gpg | sudo apt-key add -

echo "deb https://dl.yarnpkg.com/debian/ stable main" | sudo tee /etc/apt/sources.list.d/yarn.list

sudo apt update && sudo apt install yarn

yarn --version

sudo -i -u ubuntu bash << EOF

set -e

cd /home/ubuntu

sudo npm install -g pm2

git clone https://github.com/5minslearn/node_with_docker.git

cd node_with_docker

yarn install

pm2 start yarn --time --interpreter bash --name sample_node -- start -p 8000

EOF


SampleNodejsDeploySG:

Type: AWS::EC2::SecurityGroup

Properties:

GroupDescription: for the app nodes that allow ssh, http

SecurityGroupIngress:

- IpProtocol: tcp

FromPort: '80'

ToPort: '80'

CidrIp: 0.0.0.0/0

- IpProtocol: tcp

FromPort: '22'

ToPort: '22'

CidrIp: 0.0.0.0/0

- IpProtocol: tcp

FromPort: '8000'

ToPort: '8000'

CidrIp: 0.0.0.0/0
AWS CloudFormation – Attach KeyName for EC2 by reading from Parameter
In the above template, we added a parameter to get the key pair name and referenced it to KeyName property.
Great! We successfully created a CloudFormation template to create an EC2 instance and security group. In addition to that, we also added a script to deploy the NodeJS app. Now it’s time to create a CloudFormation stack.
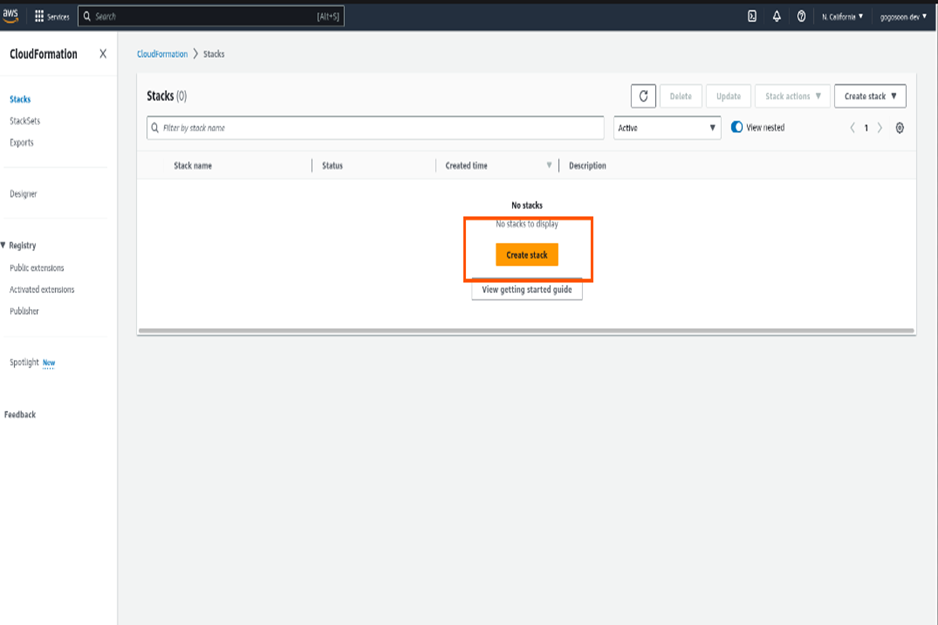
The first step is to log in to the AWS console and search for CloudFormation in the search bar (see the below screenshot). Click on stacks in the left sidebar to get started with CloudFormation.
CloudFormation Getting Started
Click on the create stack button to create the CloudFormation stack.
Create CloudFormation Stack As we have our template ready, select “Template is ready” and choose “Upload a template file” in the Template source section, and upload the template file.
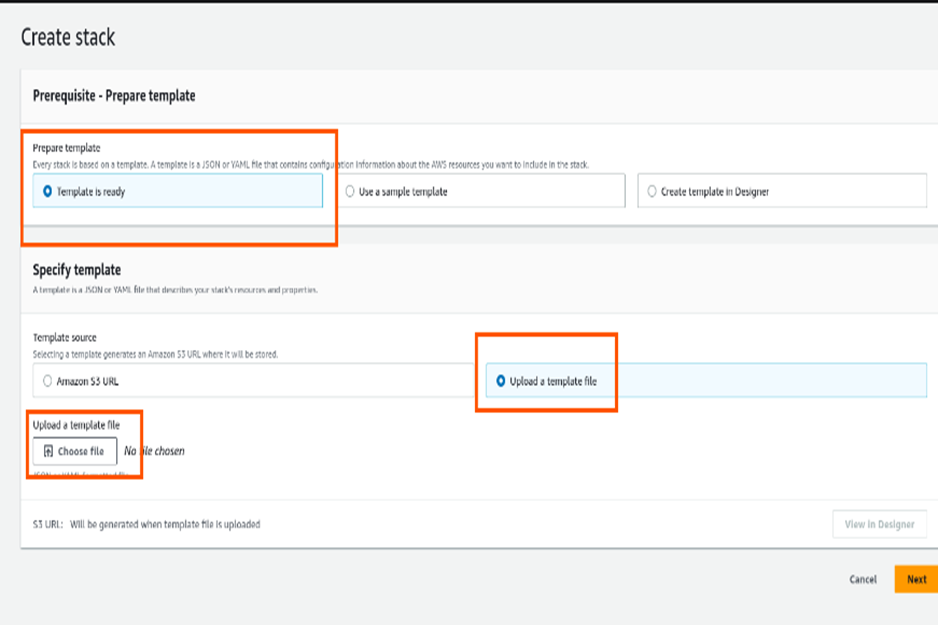
Deploying CloudFormation Template
Once you upload the file, the “View in Designer” button will be enabled. Click on it to view your template design.
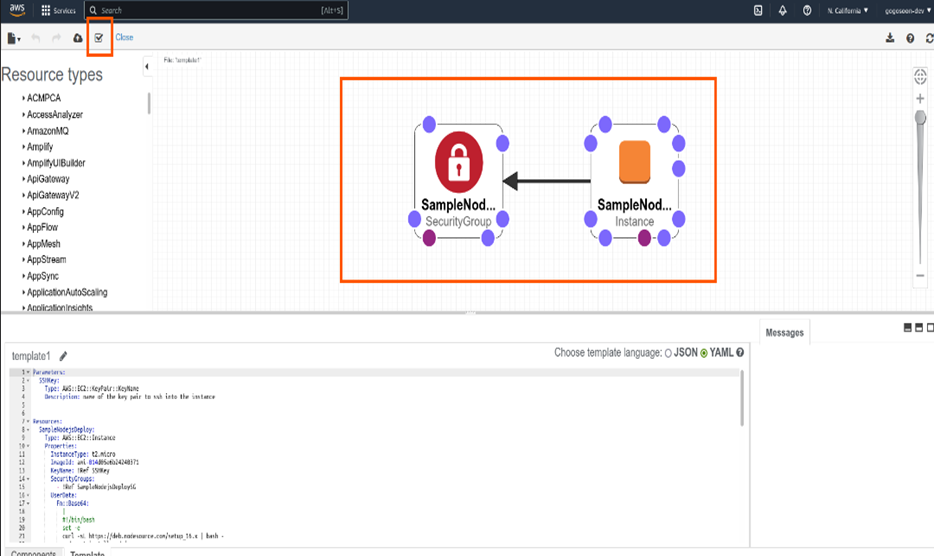
To validate our template, click on the “Tick” icon on top left in the designer. It will validate and show us errors if any. Once the validation is done, click on the “Cloud” icon to the left of “Tick” icon. It will take you to the create stack page.
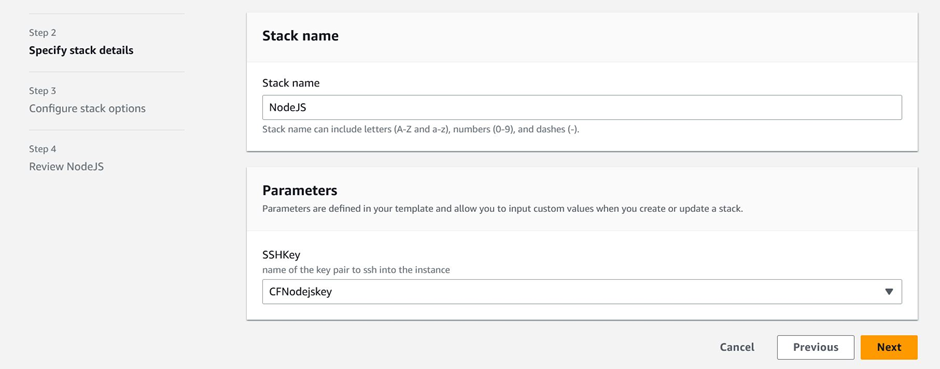
In the stack details page, enter the stack name and select your key-value pair. If you don’t have key-value pair, create one and select it.
Specify CloudFormation stack details
Leave the Configure stack options section as it is, and click continue since we don’t need any IAM permissions or advanced options.
Finally, review the page and submit the template. The template will start creating the resources.
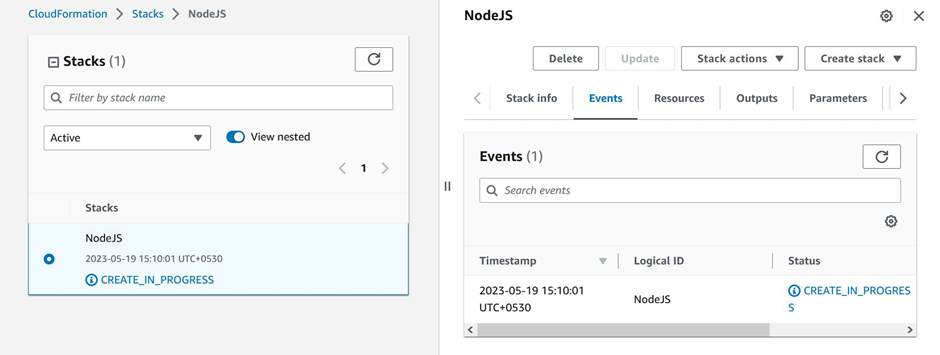
CloudFormation stack creating resources
Once that’s done, click on the resources tab. You’ll be able to see the resources we created (EC2 and Security group resources).
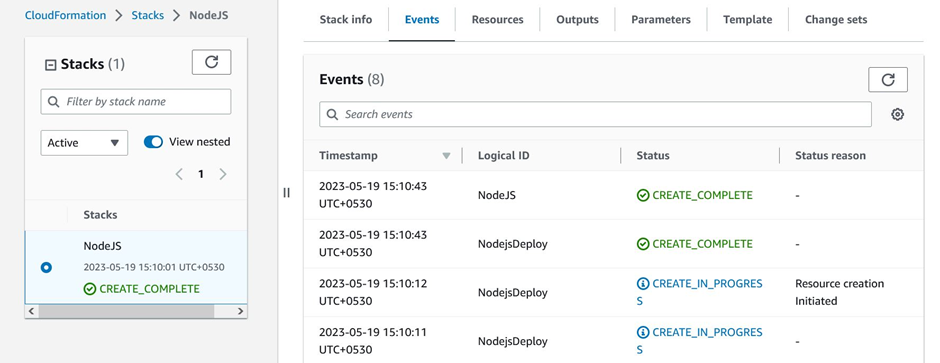
Resources created by CloudFormation Template
Click on the EC2 instance, and you can see that our instance will be up and running. Copy the public IPv4 address.
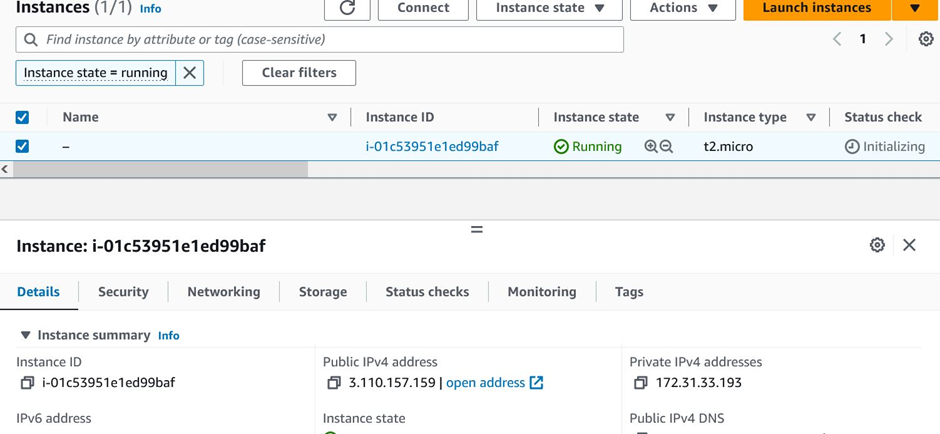
EC2 instance up and running
Open your browser and hit http://<ip_address>:8000 (In my case it is 3.110.157.159:8000/).
You should be able to see a page similar to the one below:
NodeJS app running
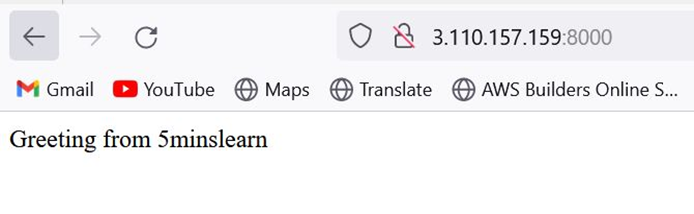
This represents that our NodeJS app is successfully deployed!
Note: EC2 user data will take some time to install dependencies. So for the first time, the page will take long time to load. Just be patient until the site is loaded.
If you no longer need the stack, you can delete it from the CloudFormation console.
Select the stack you want to delete, click “Delete Stack,” and confirm the action. This action will delete all resources created using this stack. In our case, it’ll delete both EC2 and Security Group. You don’t need to delete the EC2 instance and Security Group individually.
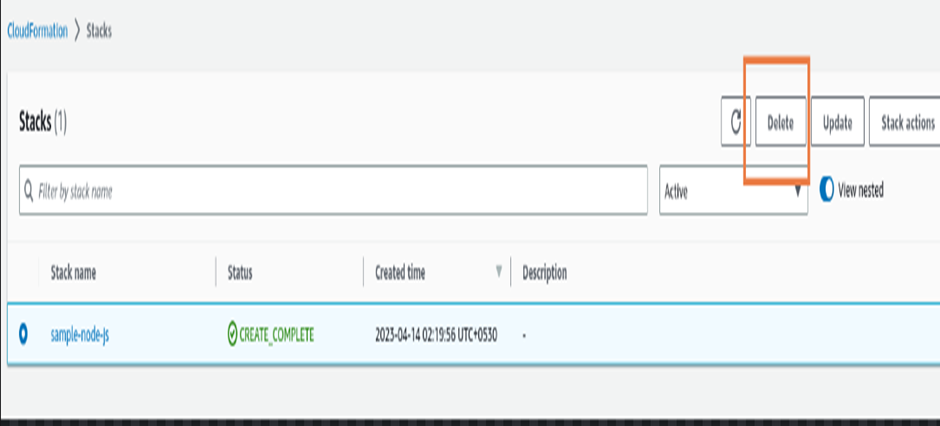
Deleting CloudFormation stack
Parameters:

SSHKey:

Type: AWS::EC2::KeyPair::KeyName

Description: name of the key pair to ssh into the instance

Resources:

NodejsDeploy:

Type: AWS::EC2::Instance

Properties:

AvailabilityZone: ap-south-1a

ImageId: ami-08e5424edfe926b43

InstanceType: t2.micro

KeyName: !Ref SSHKey

SecurityGroups:

- !Ref NodejsDeploySG

UserData:

Fn::Base64:

#!/bin/bash

set -e

curl -sL https://deb.nodesource.com/setup_19.x | bash -

sudo apt install nodejs

node -v

npm -v

curl -sS https://dl.yarnpkg.com/debian/pubkey.gpg | sudo apt-key add -

echo "deb https://dl.yarnpkg.com/debian/ stable main" | sudo tee /etc/apt/sources.list.d/yarn.list

sudo apt update && sudo apt install yarn

yarn --version

sudo -i -u ubuntu bash << EOF

set -e

cd /home/ubuntu

sudo npm install -g pm2

git clone https://github.com/5minslearn/node_with_docker.git

cd node_with_docker

yarn install

pm2 start yarn --time --interpreter bash --name sample_node -- start -p 8000

EOF

NodejsDeploySG:

Type: AWS::EC2::SecurityGroup  Properties:

GroupDescription: for the app nodes that allow ssh, http, 8000

SecurityGroupIngress:

- IpProtocol: tcp

FromPort: '80'

ToPort: '80'

CidrIp: 0.0.0.0/0

- IpProtocol: tcp

FromPort: '22'

ToPort: '22'

CidrIp: 0.0.0.0/0

- IpProtocol: tcp

FromPort: '8000'

ToPort: '8000'

CidrIp: 0.0.0.0/0
CF-Template Command Explanations:
In this article, we learned about CloudFormation, how it works, and how to create and delete a template stack.
These commands collectively set up the EC2 instance, install Node.js, Yarn, and PM2, clone a Git repository, install dependencies, and start the application using PM2.

Nirav Shah is the Director of Eternal Web Pvt Ltd, an AWS Advanced Consulting Partner and certified Odoo Partner based in the UK. With over a decade of experience in cloud computing, digital transformation, and ERP implementation, Nirav helps enterprises adopt the right technology to solve complex business challenges. He specialises in AWS infrastructure, Odoo ERP, and web development solutions for businesses across the UK and beyond.
Have queries about your project idea or concept? Please drop in your project details to discuss with our AWS Global Cloud Infrastructure service specialists and consultants.


