June 6, 2025 / Nirav Shah
As AI tools like Claude, ChatGPT, and Cursor IDE become more integrated into our workflows, context-awareness is becoming critical. That’s where the Model Context Protocol (MCP) comes in, a lightweight, open-source protocol that standardizes how applications feed structured context into large language models (LLMs).
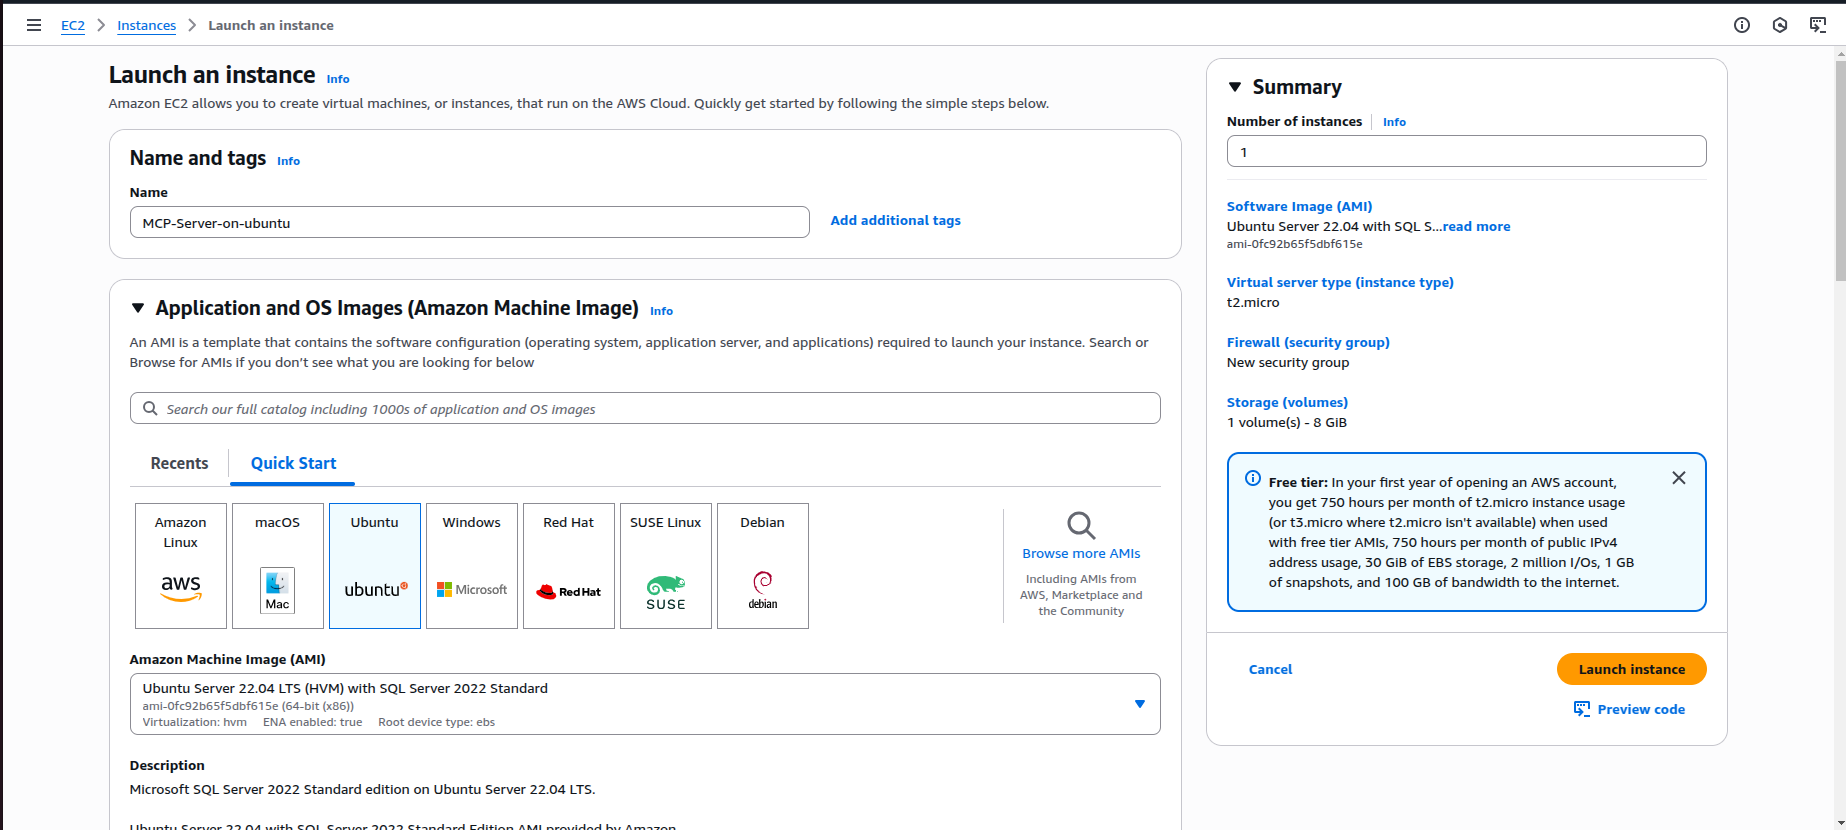
In this guide, we’ll walk through setting up an MCP server that connects to a MySQL database, served over HTTPS, and hosted on an AWS EC2 Ubuntu instance. Once deployed, this server can power intelligent apps with rich, contextual data from your internal systems.
Before we get into the weeds, a quick primer:
This guide focuses on spinning up the MCP server.
Before getting started, ensure you have:
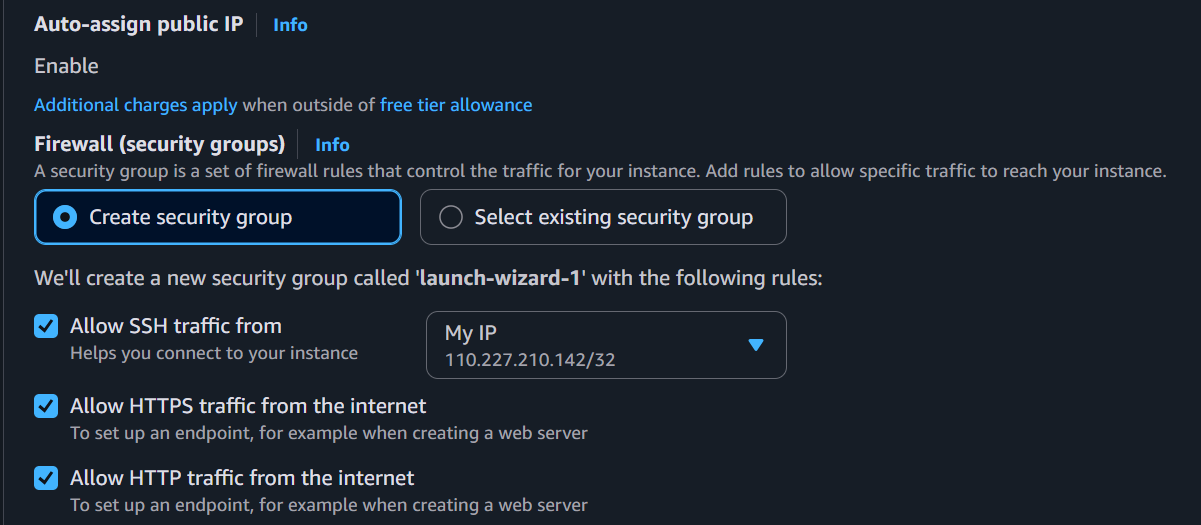

After launching my EC2 instance, I connected via SSH:
ssh -i my-key.pem ec2-user@<your-ec2-ip>
sudo apt update && sudo apt upgrade -y

sudo apt install python3 python3-pip git -y

Depending on the implementation (e.g., sample Python server), you might:
A. Use a public MCP server repo (example):
git clone https://github.com/anthropics/mcp-server-python.git

cd mcp-server-python

pip3 install -r requirements.txt
If no repo is available, you can create your own Python-based MCP server (see below).
Example: Minimal Python MCP Server
Save this as mcp_server.py:
from http.server import BaseHTTPRequestHandler, HTTPServer

import json


class MCPHandler(BaseHTTPRequestHandler):

    def do_POST(self):

        content_length = int(self.headers['Content-Length'])

        request_body = self.rfile.read(content_length)

        data = json.loads(request_body)


        print("Received MCP request:", data)


        # Sample response

        response = {

            "capabilities": ["read_files", "search_code"],

            "data": {"message": "Hello from MCP server"}

        }


        self.send_response(200)

        self.send_header('Content-type', 'application/json')

        self.end_headers()

        self.wfile.write(json.dumps(response).encode())


def run(server_class=HTTPServer, handler_class=MCPHandler, port=9000):

    server_address = ('', port)

    httpd = server_class(server_address, handler_class)

    print(f"Starting MCP server on port {port}...")

    httpd.serve_forever()


if __name__ == "__main__":

    run()
Run it with:
python3 mcp_server.py
Your MCP server will listen on port 9000.

Login to MySQL:
sudo mysql
Run:
USE mcp_demo;

CREATE TABLE users (

    id INT AUTO_INCREMENT PRIMARY KEY,

    name VARCHAR(255),

    email VARCHAR(255),

    role VARCHAR(100)

);

INSERT INTO users (name, email, role)

VALUES

(Nirav Shah, nirav@example.com', 'Admin'),

('John Doe', 'john@example.com', 'Editor');
Assuming your script is located at:
/home/ubuntu/mcp_server.py
And you’re running it using python3.
Run this command to create the service file:
sudo nano /etc/systemd/system/mcp.service
Paste the following content:
[Unit]

Description=MCP Server

After=network.target


[Service]

User=ubuntu

WorkingDirectory=/home/ubuntu

ExecStart=/usr/bin/python3 /home/ubuntu/mcp_server.py

Restart=always

RestartSec=5

StandardOutput=file:/var/log/mcp-server.log

StandardError=file:/var/log/mcp-server-error.log


[Install]

WantedBy=multi-user.target
sudo systemctl daemon-reexec

sudo systemctl daemon-reload

sudo systemctl enable mcp
sudo systemctl start mcp
sudo systemctl status mcp
You should see output like:

You’ll access MCP securely at:
https://your-domain.com
sudo apt update

sudo apt install nginx certbot python3-certbot-nginx -y
Make sure your domain (e.g., mcp.mydomain.com) points to your EC2 public IP using an A Record.
Create a new Nginx config file:
sudo nano /etc/nginx/sites-available/mcp
Paste this config:
server {

    listen 80;

    server_name mcp.eternalsoft.com;


    location / {

        proxy_pass http://127.0.0.1:9000;

        proxy_set_header Host $host;

        proxy_set_header X-Real-IP $remote_addr;

        proxy_set_header X-Forwarded-For $proxy_add_x_forwarded_for;

        proxy_set_header X-Forwarded-Proto $scheme;

    }

}
Replace mcp.yourdomain.com with your actual domain.
sudo ln -s /etc/nginx/sites-available/mcp /etc/nginx/sites-enabled/

sudo nginx -t

sudo systemctl restart nginx
sudo certbot --nginx -d mcp.eternalsoft.in

Now adding handler for the GET request:
To fix it, simply add a do_GET method to your MCPHandler class.
– Updated mcp_server.py with GET Support
Add the do_GET method inside your MCPHandler class:
from http.server import BaseHTTPRequestHandler, HTTPServer

import json

import mysql.connector


class MCPHandler(BaseHTTPRequestHandler):

    def do_GET(self):

        """Handles GET requests to verify server is running."""

        self.send_response(200)

        self.send_header("Content-Type", "text/plain")

        self.end_headers()

        self.wfile.write(b"MCP Server is running.")


    def do_POST(self):

        """Handles POST requests to query the MySQL database."""

        content_length = int(self.headers['Content-Length'])

        post_data = self.rfile.read(content_length)


        try:

            data = json.loads(post_data.decode('utf-8'))

        except json.JSONDecodeError:

            self.send_response(400)

            self.end_headers()

            self.wfile.write(b'Invalid JSON')

            return


        table = data.get("table", "users")  # Default to 'users' table


        try:

            conn = mysql.connector.connect(

                host="localhost",

                user="mcpuser",  # Replace with your MySQL user

                password="StrongPasswordHere",  # Replace with your MySQL password

                database="mcp_demo"

            )

            cursor = conn.cursor(dictionary=True)

            query = f"SELECT * FROM {table} LIMIT 100"

            cursor.execute(query)

            results = cursor.fetchall()


            self.send_response(200)

            self.send_header("Content-Type", "application/json")

            self.end_headers()

            self.wfile.write(json.dumps(results, default=str).encode('utf-8'))


        except mysql.connector.Error as err:

            self.send_response(500)

            self.end_headers()

            self.wfile.write(f"MySQL error: {err}".encode('utf-8'))


        finally:

            if 'cursor' in locals():

                cursor.close()

            if 'conn' in locals():

                conn.close()


def run(server_class=HTTPServer, handler_class=MCPHandler):

    server_address = ('0.0.0.0', 9000)

    httpd = server_class(server_address, handler_class)

    print("MCP server running on port 9000...")

    httpd.serve_forever()


if __name__ == '__main__':

    run()
sudo systemctl restart mcp.service
Now visit: https://mcp.eternalsoft.in/


Nirav Shah is the Director of Eternal Web Pvt Ltd, an AWS Advanced Consulting Partner and certified Odoo Partner based in the UK. With over a decade of experience in cloud computing, digital transformation, and ERP implementation, Nirav helps enterprises adopt the right technology to solve complex business challenges. He specialises in AWS infrastructure, Odoo ERP, and web development solutions for businesses across the UK and beyond.
Have queries about your project idea or concept? Please drop in your project details to discuss with our AWS Global Cloud Infrastructure service specialists and consultants.


