March 16, 2021 / Nirav Shah
Odoo is an all-in-one management software that offers a range of business applications that form a complete suite of enterprise management applications targeting companies of all sizes. Odoo is an all-in-one business software including CRM, website/e-commerce, billing, accounting, manufacturing, warehouse and project management, and inventory.
Updating System Packages
sudo yum update
sudo yum install epel-release
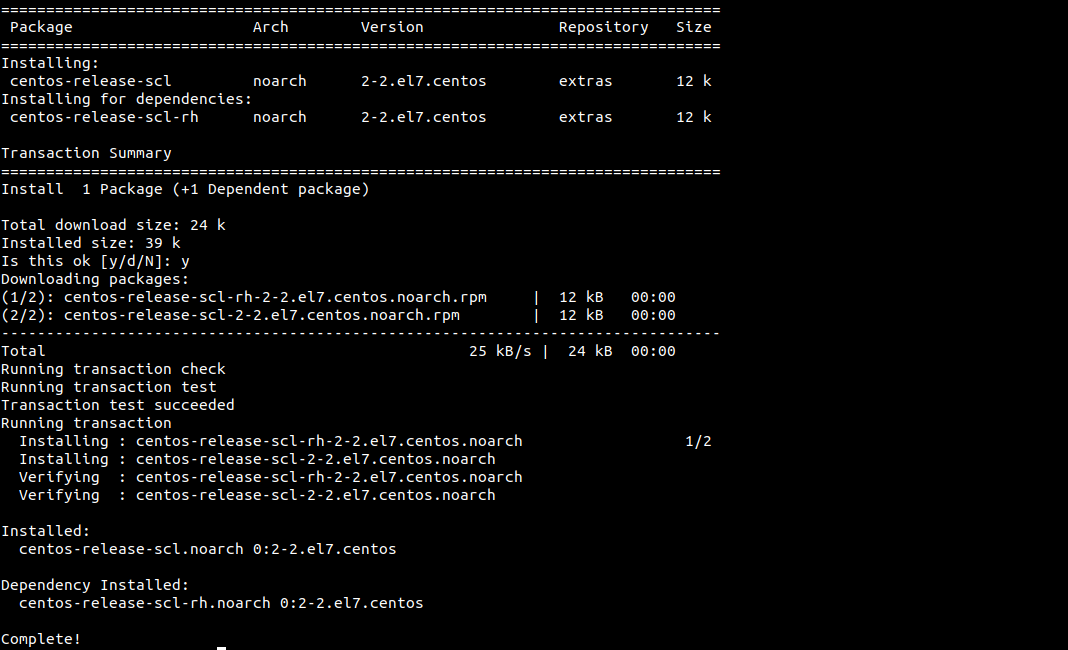
Install the packages from the Software Collections (SCL) repository.
sudo yum install centos-release-scl
Proceed to install Python 3.5 packages with the command below:
sudo yum install rh-python35
Building Odoo requires some dependencies such as git and pip.
sudo yum install git gcc wget nodejs-less libxslt-devel bzip2-devel openldap-devel libjpeg-devel freetype-devel postgresql-devel
Create new user,
sudo useradd -m -U -r -d /opt/odoo -s /bin/bash odoo
Now install postgresql
sudo yum install postgresql-server
sudo postgresql-setup initdb
After initialization, enable and start the PostgreSQL service
sudo systemctl enable postgresql
sudo systemctl start postgresql
We need to create a PostgreSQL user; this username has to be the same name as the previously created system user, in our case odoo.
sudo su - postgres -c "createuser -s odoo"
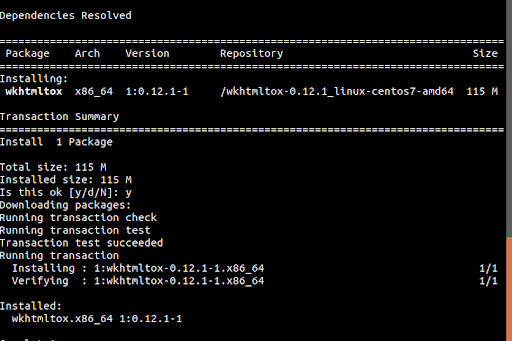
Install Wkhtmltopdf
wget https://github.com/wkhtmltopdf/wkhtmltopdf/releases/download/0.12.1/wkhtmltox-0.12.1_linux-centos7-amd64.rpm
sudo yum localinstall wkhtmltox-0.12.1_linux-centos7-amd64.rpm
Install and Configure Odoo
Before starting with the installation process, we need to switch to the odoo user that was created earlier.
sudo su - odoo
Next, we are going to install Odoo from the GitHub repository so we can have more control over versions and updates.
git clone https://www.github.com/odoo/odoo --depth 1 --branch 11.0 /opt/odoo/odoo11
Enable software collections so we can access the python 3.5 binaries:
scl enable rh-python35 bash
Next, activate the environment created with the command below:
source odoo11-venv/bin/activate
sudo mkdir /opt/odoo/custom-addons-for-odoo11
sudo chown odoo: /opt/odoo/custom-addons-for-odoo11
Lastly in this section, we need to create a configuration file:
sudo nano /etc/odoo11.conf
[options]
; This is the password that allows database operations:
admin_passwd = admin_password
db_host = False
db_port = False
db_user = odoo
db_password = False
addons_path = /opt/odoo/odoo11/addons
; If you are using custom modules
; addons_path = /opt/odoo/odoo11/addons,/opt/odoo/custom-addons-for-odoo11
Note: Remember to change the admin password to a more secure password and modify the addons path if you are using custom modules.
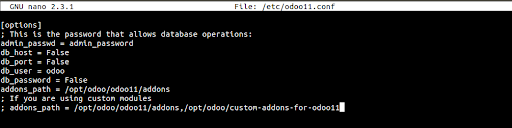
Save and close the file.
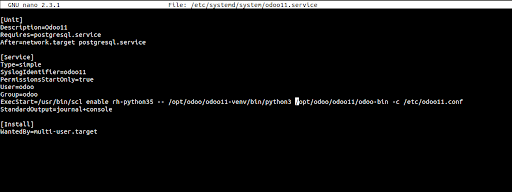
We need to create a systemd unit file called odoo11.service in order to run odoo as a service unit file in the /etc/systemd/system/ directory with the following contents:
sudo nano /etc/systemd/system/odoo11.service
[Unit]
Description=Odoo11
Requires=postgresql.service
After=network.target postgresql.service
[Service]
Type=simple
SyslogIdentifier=odoo11
PermissionsStartOnly=true
User=odoo
Group=odoo
ExecStart=/usr/bin/scl enable rh-python35 --
/opt/odoo/odoo11-venv/bin/python3
/opt/odoo/odoo11/odoo-bin -c /etc/odoo11.conf
StandardOutput=journal+console
[Install]
WantedBy=multi-user.target
Save and close the file.
Next, we need to reload systemd since we just created a new unit file and start the Odoo service by executing:
sudo systemctl daemon-reload
sudo systemctl start odoo11
We can now check the service status with the command below:
sudo systemctl status odoo11
If there are no errors, you can enable the Odoo service to be automatically started at boot time with the command below:
sudo systemctl enable odoo11
Odoo, by default, uses the port 8069, therefore you are going to open the port on your firewall (CSF) using the command below:
nano /etc/csf/csf.conf
Navigate to the SECTION: IPv4 Port Settings and add 8069 to the list of ports. Open your browser and type: your _ domain _ or _ IP _ address:8069


Nirav Shah is the Director of Eternal Web Pvt Ltd, an AWS Advanced Consulting Partner and certified Odoo Partner based in the UK. With over a decade of experience in cloud computing, digital transformation, and ERP implementation, Nirav helps enterprises adopt the right technology to solve complex business challenges. He specialises in AWS infrastructure, Odoo ERP, and web development solutions for businesses across the UK and beyond.
Have queries about your project idea or concept? Please drop in your project details to discuss with our AWS Global Cloud Infrastructure service specialists and consultants.


